Version 2020.10.0
The Obeo Cloud Platform Modeler is a unique technology to easily develop custom and state-of-the-art modeling tools to be deployed to the Cloud.
The Obeo Cloud Platform Modeler is built as an open-core product relying on the open source Eclipse Sirius project (EPL 2.0 licence) and more precisely on the Sirius Web component. Sirius Web is a framework from Obeo for building cloud graphical modeler for a dedicated DSL. The Obeo Cloud Platform Modeler is a Sirius Web build extended with Enterprise features, to deploy on public, private clouds or on premise and including support and upgrade guarantees.
This documentation details features coming from Sirius Web and the Obeo Cloud Platform Modeler. You can see if a feature comes with Sirius Web or the Obeo Cloud Platform Modeler thanks to the Before you Start section :
-
the icon highlights open source features from Sirius Web,
-
the icon highlights enterprise features from the Obeo Cloud Platform Modeler.
User Manual
1. Get Started
1.1. Ask for an Obeo Cloud Platform Modeler account
|
Before you Start
Who can use this feature Anyone can ask for a free Obeo Cloud Platform Modeler account. Check out our Obeo Cloud Platform Modeler requirements section for supported browsers and platforms. Included in the Obeo Cloud Platform Modeler |
1.1.1. Invite-only Sign up
As the Obeo Cloud Platform Modeler is still in beta testing, you can join only on invitation. You can sign up by filling our form at https://www.obeocloudplatform-demo.com/signup or by sending an email to ocp-modeler@obeosoft.com. We need you to send us these information :
-
First name,
-
Last name,
-
Company,
-
Country,
-
Email,
-
Phone,
-
That you agree to the Terms of Use and Privacy Policy associated to the Obeo Cloud Platform Modeler service,
-
If you want to subscribe to the Obeo mailing list to be informed about products (latest versions, articles, documentation, …) and upcoming events.
Only your email and the agreement with the Terms of Use and Privacy Policy is mandatory.
1.2. Obeo Cloud Platform Modeler requirements
Obeo Cloud Platform Modeler is browser-based software, which means it can be run on all full desktop operating systems (MacOS, Windows, Linux, etc), as well as Chrome OS.
1.2.1. Supported browsers and operating systems
The minimum browser requirements is:
-
Chrome 84, 85, 86
|
We have planned to support for a later version:
|
| Obeo Cloud Platform Modeler does not support Internet Explorer : Supported Browser |
The minimum operating system (OS) requirements are:
-
Windows 8.1 or later
-
Apple MacOS 10.10 (Yosemite) and later
-
Any Linux OS that supports the browsers mentioned above
-
Any Chrome OS that supports the browsers mentioned above
| You can find out what browser and operating system version you’re using via What’s my Browser. |
| If you are encountering speed, upload, download, or various interface problem with Obeo Cloud Platform Modeler it could be caused by a plugin, add-on, or extension that you have installed in your browser. To see if this is the case you can try disabling all plugins, add-ons, or extensions within your browser. |
1.3. Get help from the Obeo Cloud Platform Modeler Support Team
|
Before you Start
Who can use this feature All the users have access to free email support Check out our Obeo Cloud Platform Modeler requirements section for supported browsers and platforms. included in the Obeo Cloud Platform Modeler |
The Obeo Cloud Platform Modeler offers support for all our users! We currently provide email-based support which we’ve found to be most effective for a number of reasons.
It’s easy for our support team to triage conversations and get them to the right people quickly. This helps us get you the answers you need so you can get back to modeling. It’s also easy for users to attach files, videos, and screenshots that our support team might need for troubleshooting more complicated issues.
When you need us, we’re here to help.
Contact the Obeo Cloud Platform Modeler support by sending an email to: ocp-modeler@obeosoft.com.
1.3.1. What are Obeo Cloud Platform Modeler support hours?
Our support team members are in Europe.
Support hours: Monday through Friday 9am - 5pm (CET / UTC +01).
2. Using the Obeo Cloud Platform Modeler
2.1. Authentication
2.1.1. Log in to your Obeo Cloud Platform Modeler account
|
Before you Start
Who can use this feature Users with Any account Users will need to have already signed up for an Obeo Cloud Platform Modeler account Included in the Obeo Cloud Platform Modeler |
There is one way to log in to your Obeo Cloud Platform Modeler account.
2.1.2. Default redirection to log in page
While you are not not logged in by default you are redirected to the log in page.
2.1.3. Log in with your Username and Password
-
Enter your Username and Password in the fields provided.
-
Click Log in to complete the process and access your account.
2.1.4. Log out
|
Before you Start
Who can use this feature Users with Any account Users will need to have already logged in Included in the Obeo Cloud Platform Modeler |
To log out:
-
Go to the up right corner on any Obeo Cloud Platform Modeler pages,
-
Click on the avatar, you can select the
Log outmenu. When you are logged out then you will be automatically redirected to the Log in page.
2.1.5. Authentication FAQ
My credentials do not work, I can’t log in!
If you are on Windows, please check that your antivirus software is not configured to block the Obeo Cloud Platform Modeler authentication page. Else check with the Obeo Cloud Platform Modeler administrator that your credentials are valid, send an email to ocp-modeler@obeosoft.com.
How do I get an account to the Obeo Cloud Platform Modeler?
Navigate to the sign up page, fill the form and send your reqest. If you did not receive any news for 2 days, ask for a Username and a Password to the administrator of the Obeo Cloud Platform Modeler server by sending an email to ocp-modeler@obeosoft.com.
How do I retrieve my Username / Password if I forgot them?
Ask to the administrator of the Obeo Cloud Platform Modeler server to send you back your credentials.
How do I change my Username?
Ask to the administrator of the Obeo Cloud Platform Modeler server to change the Username for you.
How do I reset my Password?
Ask to the administrator of the Obeo Cloud Platform Modeler server to generate a new password for you.
How do I delete my account?
Ask to the administrator of the Obeo Cloud Platform Modeler server to delete your account.
2.2. Projects
2.2.1. Getting started with Projects
|
Before you Start
Who can use this feature Users with Any account Users with Edit and Read-only access can work with projects Included in Sirius Web |
2.2.2. Project Structure
You can use Projects to group Models. It is not possible to create subprojects in your projects. All the models are represented at the same level in a project.
2.2.3. Project Browser
The Projects Browser lists all the projects accessible with your account. To get it, navigate to: https://www.obeocloudplatform-demo.com/projects
2.2.4. Create a Project
You can create a Project from your Project Browser by clicking on:
-
New project:
-
It opens the Create a new project page,
-
Enter the project name,
-
Set the Project Visibility,
-
Click on Create project.
-
-
Upload a Project: to create a project based on an existing one you have saved on your computer.
Every project you create will then have its own Project Editor.
|
Projects can be either private (the default) or public. Public projects are visible (but not editable) to all connected users. Private projects are only accessible to specific users with whom you share it. See Share a Project and Project Teams for more details. |
2.2.5. Rename a Project
|
Before you Start
Who can use this feature Users with Any account Users with Edit access to the project Included in Sirius Web |
You can update the Project name from the Project Browser:
-
In the Project list, go over the Project to get the Rename button,
-
Click on the Rename button,
-
Update the name in the editable field,
-
Click on Rename.
Project names don’t need to be unique. Unique names do make it easier when it comes to finding the correct Project.
2.2.6. Delete a Project
|
Before you Start
Who can use this feature Users with Any account Users with Edit access to the project Included in Sirius Web |
You can delete a Project from the Project Browser:
-
In the Project list, go over the Project to get the Delete button,
-
Click on the Delete button.
|
When you delete a project, you will lose all the data. If the project is a Public or Private project shared with other users, it will be deleted for everyone. |
2.2.7. Share a Project
|
Before you Start
Who can use this feature Users with Any account Users with Edit access to the project Included in Sirius Web |
You can own projects individually, or you can share projects with other people.
You can restrict who has access to a project by choosing the project’s visibility. For more information, see Project Owner and Visibility.
For projects you own, you can give other users access so that they can collaborate on your project.
-
Open the Project Editor.
-
Click the Settings button in the right-corner.
-
Set the Visibility:
-
Select Public to give read-only access to everyone to your project.
-
Select Private to give more fined-grained access to selected members of a Project Teams.
-
2.2.8. Share a Diagram
|
Before you Start
Who can use this feature Users with Any account Users with Read-only access to the project Included in Sirius Web |
-
Open the Project Editor.
-
Select a diagram in the Project Explorer.
-
Click the Share button at the top of the diagram area.
-
Copy the link to your clipboard.
Provided they have an account and at least read-level access to the project, anybody you share the link with can use it to go directly to this specific diagram.
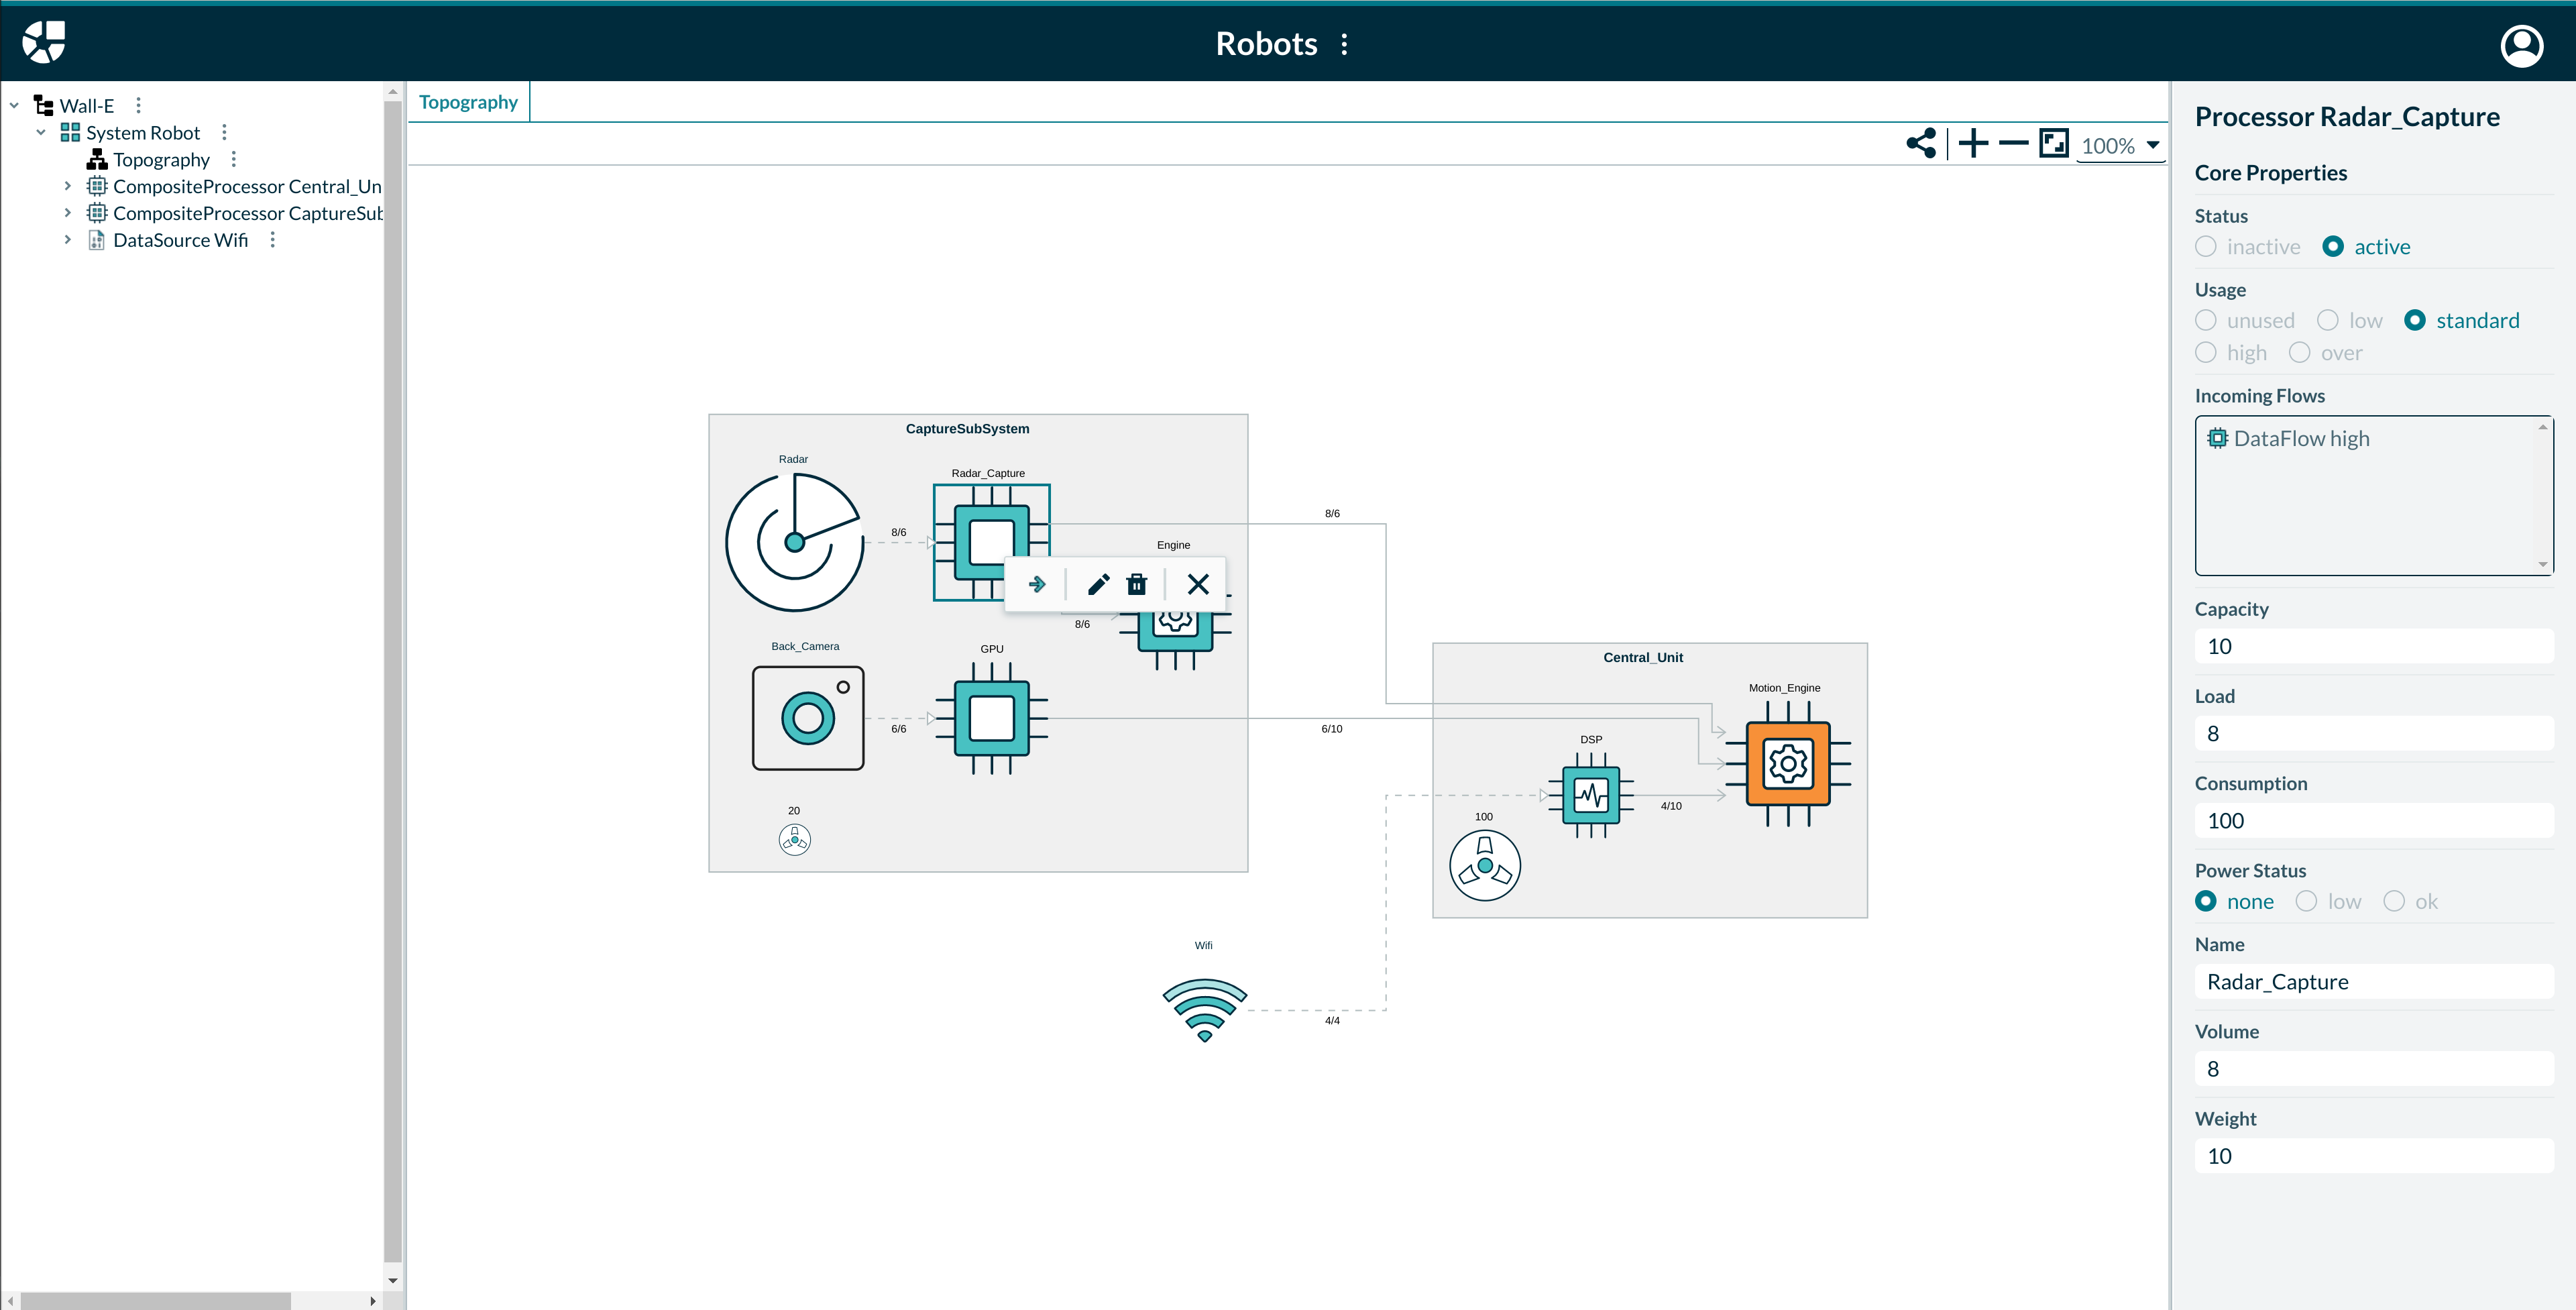
2.2.9. Project Editor
In the body of the Project Editor you can see:
-
The Project Explorer with all the models in this Project,
-
The Details View which presents the properties of the current selected element,
-
The Diagram Editor to manage model elements graphically.
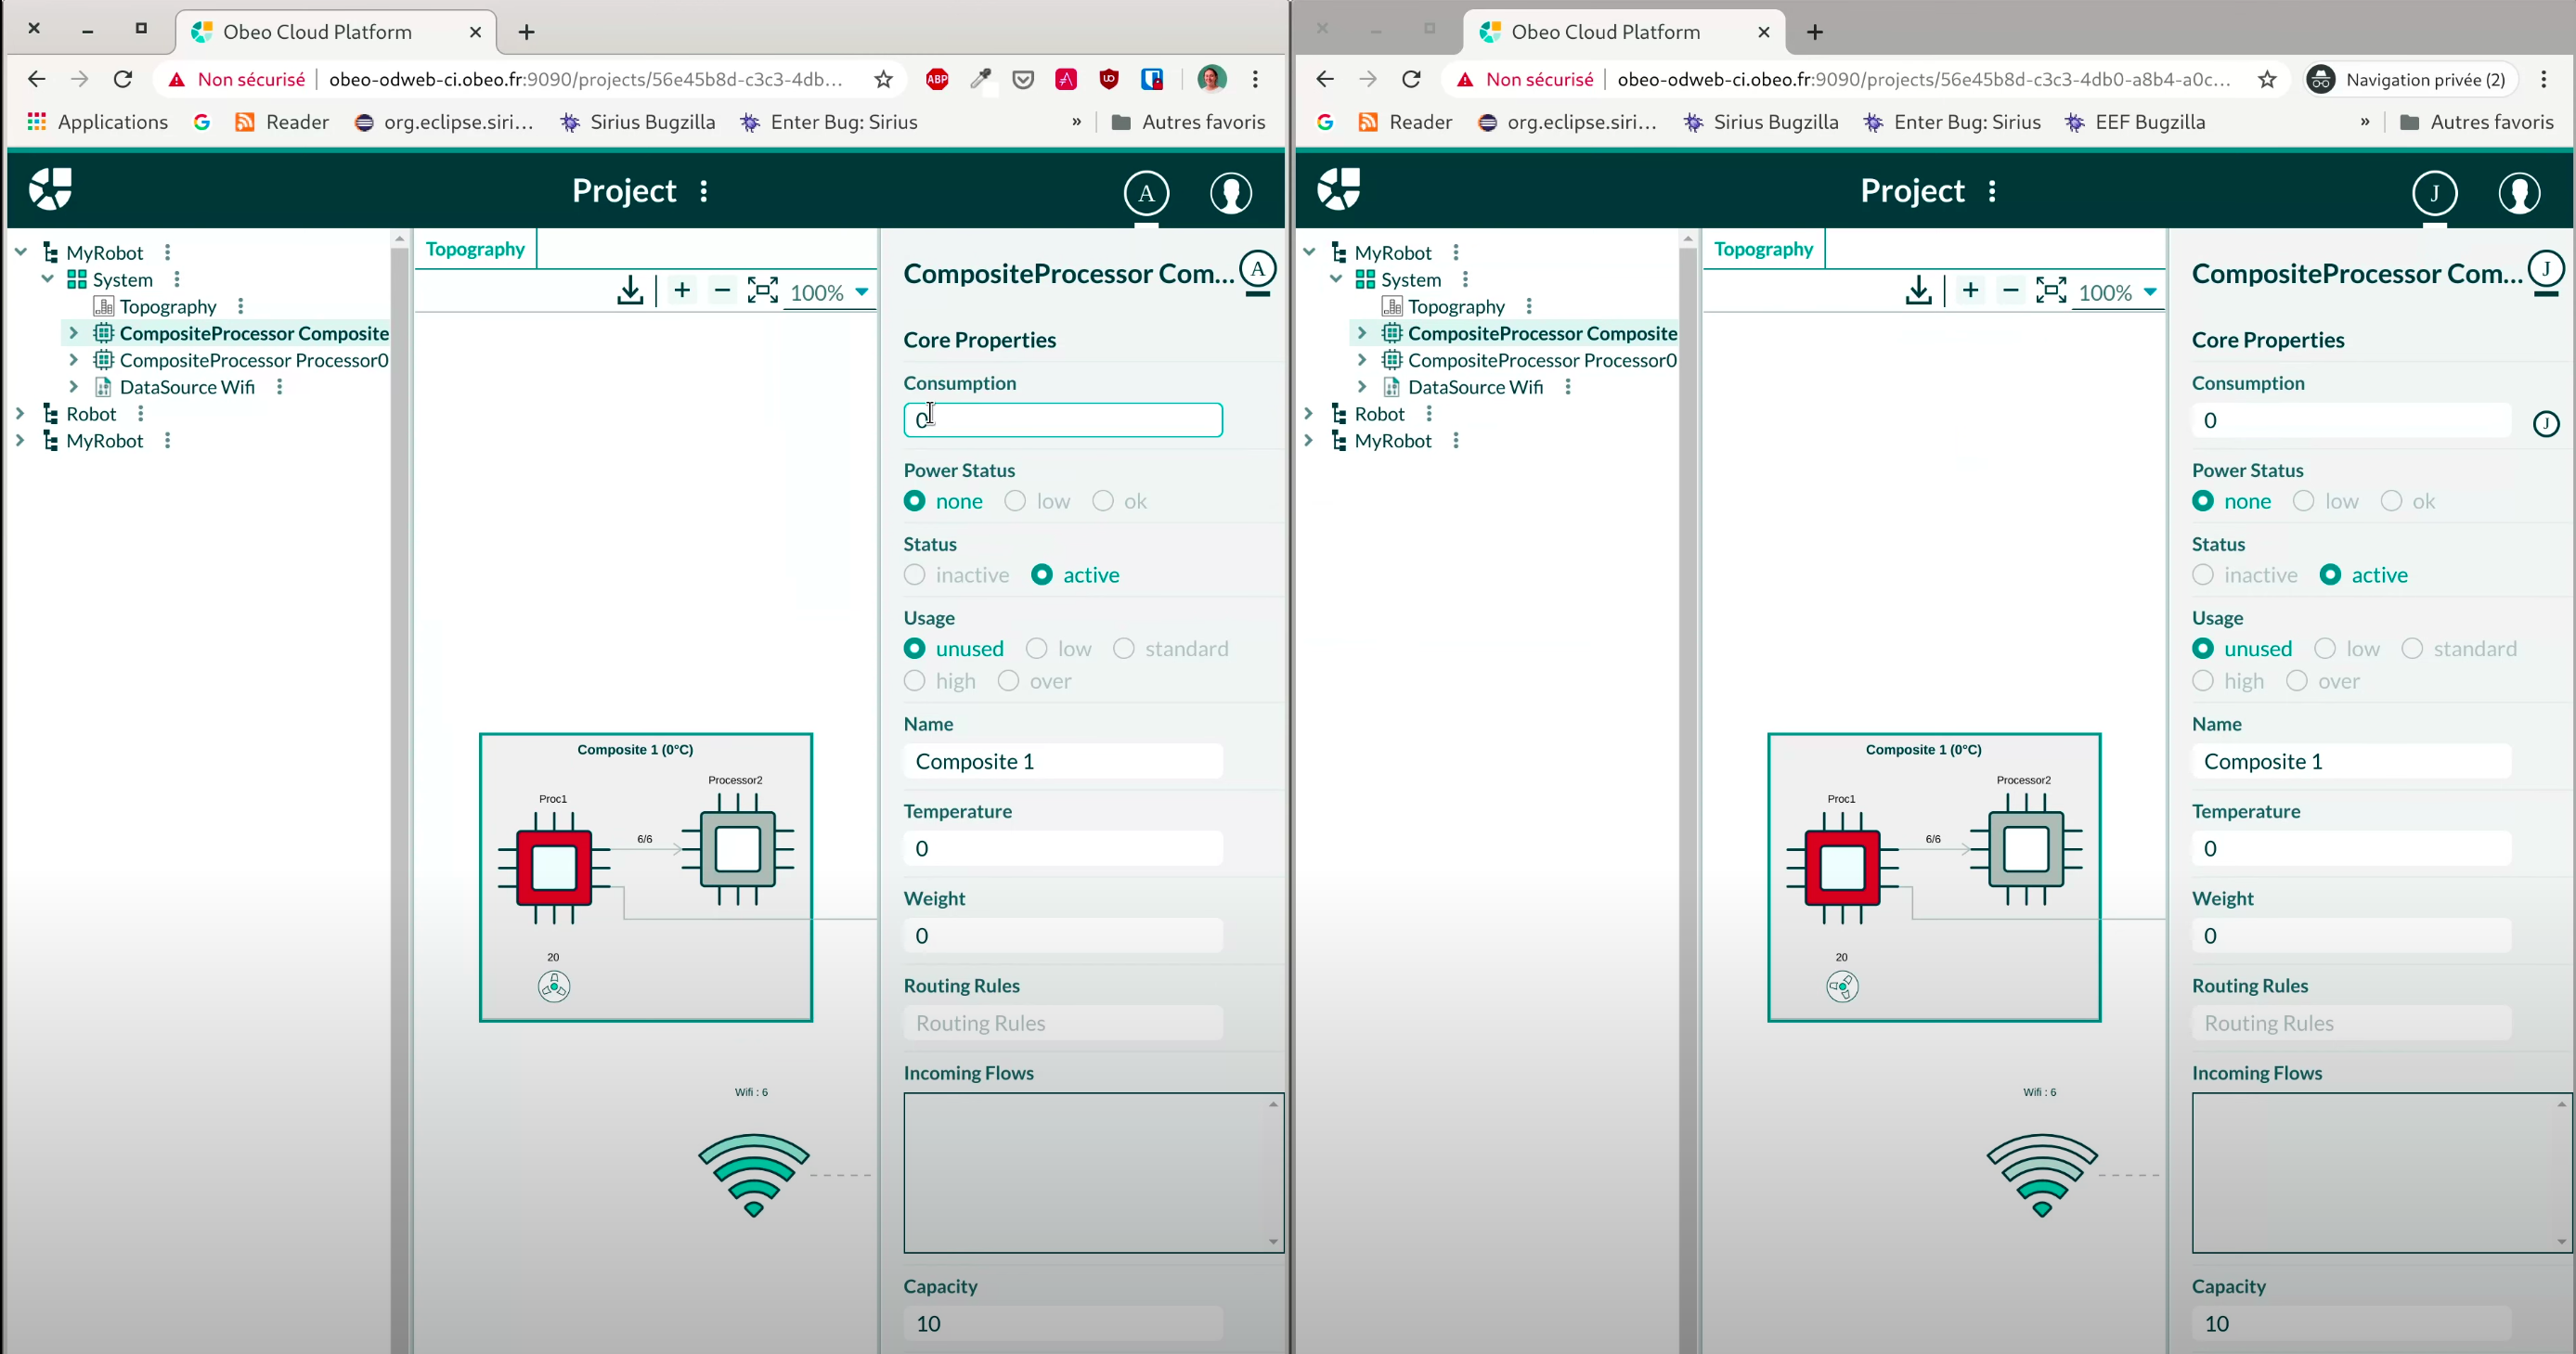
Details View
The details view shows the characteristics of the selected semantic object. It is made up Property sections for each characteristic of the semantic object.
Textfield property Section
The content of the textfield is sent to the server when the end user uses the "Enter" key.
Textarea property Section
As this widget contains multiple lines, the "Enter" key will add a new line. The content of the textarea is sent to the server only when the focus is lost.
Create a new Model in a Project
|
Before you Start
Who can use this feature Users with Any account Users with Edit access to the project Included in Sirius Web |
-
Open the Project Editor.
-
Open the context menu of the project
-
Select the New model action.
-
Fill the model Name.
-
Select the Model type.
-
Click the Create button.
The newly created model is listed in the Project Explorer.
2.2.10. Project Settings
|
Before you Start
Who can use this feature Users with Any account Users with Edit access to the project Included in the Obeo Cloud Platform Modeler |
You can adjust various settings of a project from the Project Settings page, accessible using the gears icon in the top-right of the Project Editor:
-
The Overview tab gives some general information about the project.
-
From the Teams tab you can give fine-grained access to the project to specific groups of users.
-
From the Webhooks tab you can configure which webhooks are enabled for this project.
Project Owner and Visibility
The current project owner and visibility are available in the Overview tab of the project settings.
A project is always owned by a single user, initially the one who created the project. Regardless of the other settings, the project owner always has complete admin access to the project and its settings.
If you are the owner of a project or have admin rights on it, you can transfer the ownership to a different user. In the Overview tab of the project settings page:
-
enter the username (login) of the new owner in the text field.
-
click on the Change owner button.
The effect is immediate. Note that if the project is private and you do not have explicit access to it as part of a Team (see below), transfering ownership to someone else can lock you out of the project. Use with caution!
A project also has a visibility, which can be either public or private.
-
If a project is public, all users on the system will be able to view all of its content, but not make any modification (unless explicitly authorized).
-
If a project is private, by default only the project owner can view it.
To change the visibility of a project after its creation, assuming you have the rights to do it, simply select your choice in the project setting’s overview tab. The effect is immediate.
To give Read-only access to a private project or give collaborators Edit access to a (public or private) project, you can define Teams in the corresponding tab.
Project Teams
Teams let you invite collaborators to access your project. You can control how collaborators interact with your Team using Access level.
Adjust Team Access Level
As the owner of a project, you can update the access level of a team at any time:
-
Open the Project Settings page.
-
Click the View all teams link next to the Teams section.
-
Set the Access level for a team.
There are three to choose from:
-
Read-only: Viewers can only see all the models and representations of the project but can not make any change.
-
Edit: Contributors can see, create and edit all the models and representations of the project.
-
Admins: Administrators can see, create and edit all the models and representations of the project and manage the project owner and teams.
This setting will define what level of access each user or team has within a project. Note that a given user can be part of multiple teams; in that case, his access level is the highest one of all the teams he is part of.
Public Project |
Private Project |
||||||||
|---|---|---|---|---|---|---|---|---|---|
View |
Edit |
Manage |
Own |
View |
Edit |
Manage |
Own |
||
Everyone |
|
|
|||||||
Team member |
Viewer |
|
|
||||||
Contributor |
|
|
|
|
|||||
Administrator |
|
|
|
|
|
|
|||
Owner |
|
|
|
|
|
|
|
|
|
Create a Team
When you create a new team, the first thing to define, aside from its name, is its Access Level.
To create a new team:
-
Open the Project Settings page.
-
Click the View all teams link next to the Teams section.
-
Click the New team button.
-
Set the team name.
-
Set the access level.
-
Click on Create team.
|
Three teams are created by default:
|
Delete a Team
To delete a team:
-
Open the Project Settings page.
-
Click the View all teams link next to the Teams section.
-
Click the Delete button in the Team’s list.
Add a Team Member
-
Open the Project Settings page.
-
In the Add member section, set the Username of the collaborator you want to invite.
-
Select the Team of the collaborator.
-
Click on the Add button.
The collaborator is listed in the Teams section under the selected team.
Remove a Team Member
-
Open the Project Settings page.
-
In the Add member section, set the Username of the collaborator you want to remove.
-
Select the Team of the collaborator.
-
Click on the Remove button.
See a Team Member
-
Open the Project Settings page.
-
Navigate to the Teams section. It lists all the teams with their members. It shows also the access level associated to the team.
Webhooks
See the relative section in the Developer guide.
2.3. Download / Upload
2.3.1. Getting started with Downloads
|
Before you Start
Who can use this feature Users with Any account Users with Edit and Read-only access to a project can export data Included in Sirius Web |
The Download feature allows you to export your data from the Obeo Cloud Platform Modeler to your computer.
Download a Project
To export a project to your local disk, you have to :
-
Go to the Projects management page,
-
Go over a project in the projects' list, some buttons appear,
-
Click on the Download button, an archive named ProjectName.zip is saved on your disk.
| The archive contains all the representations and models defined in your project serialized as JSON. |
Download a Model
To export a model to your local disk, you have to :
-
Go to the Models management page,
-
Go over a model in the projects' list, some buttons appear,
-
Click on the Download button, an XML file named ModelName.xmi is saved on your disk.
| To store the model content, we use the EMF persistence framework and the default XMI provider. XMI (XML Metadata Interchange) is a standard for exchanging metadata information via Extensible Markup Language (XML). |
2.3.2. Getting started with Uploads
|
Before you Start
Who can use this feature Users with Any account Users with Edit access to a project can export data Included in Sirius Web |
The Upload feature allows you to import your data from your computer the Obeo Cloud Platform Modeler.
Upload a Project
To import a project into the Obeo Cloud Platform Modeler, you have to :
-
Go to the Projects management page,
-
Click the Upload project button,
-
Click on the Click here to select a file area,
-
Select a compatible archive with the file selector,
-
Click on the Upload project button,
-
The project page opens, you can see the models in the model explorer.
| A compatible archive is a zip file you retrieved from the Download a Project action in the Obeo Cloud Platform Modeler. |
Upload a Model
To import a model from your local disk to the Obeo Cloud Platform Modeler, you have to :
-
Go to the Project Editor,
-
In the Project Explorer, select the top-level element corresponding to the model you want to export, and open the context menu that appears.
-
Click on the Download button, an XML file named ModelName.xmi is saved on your disk.
To store the model content, we use the EMF persistence framework and the default XMI provider. XMI (XML Metadata Interchange) is a standard for exchanging metadata information via Extensible Markup Language (XML).
2.3.3. Export FAQ
Is it possible to upload an EMF model I created classicaly with Eclipse?
Yes definitely, if the metamodel corresponding to the model instance is deployed on the server. You can use the Upload a Model capability to import your data into the Obeo Cloud Platform Modeler.
How do I download a project?
See the Download a Project section to learn how to proceed.
How do I download a model?
See the Download a Model section to learn how to proceed.
How do I upload a project?
See the Download a Project section to learn how to proceed.
How do I upload a model?
See the Download a Model section to learn how to proceed.
3. Administrate the Obeo Cloud Platform Modeler
3.1. Account Administration
3.1.1. Getting started with Accounts' Administration
|
Before you Start
Who can use this feature Users with Administrator access to the server can manage the users' accounts Included in the Obeo Cloud Platform Modeler |
As an administrator you can manage user accounts:
-
Navigate to the Log in page to connect to the Obeo Cloud Platform Modeler with your Administrator credentials
-
Then go to the Administration home page : https://www.obeocloudplatform-demo.com/admin/accounts
3.1.2. Get all the existing accounts
On the accounts page you can see all the Normal and Administrator accounts listed by Usernames active for the running Obeo Cloud Platform Modeler instance.
3.1.3. Create an account
To add a new user account:
-
Navigate to the Administration home page
-
Click on the New account button
-
Fill the Username, Password, Confirm password fields
-
Click on the Submit button
-
Send the credentials you just created to the user via a secure channel
3.1.4. Remove an account
To delete an existing user account:
-
Navigate to the Administration home page
-
Click on a user in the users' list
-
Click on the Delete button
-
Confirm the deletion
3.1.5. Change the password
To change the password of an existing user account:
-
Navigate to the Administration home page
-
Click on a user in the users' list
-
You are redirected to the Reset Password page
-
Fill the Password and Confirm password field with the new values
-
Click Submit to apply
Developer Guide
This sections describes the main APIs that are exposed by the Obeo Cloud Platform Modeler to build custom modelers and extend the platform.
Every instance of the Obeo Cloud Platform Modeler is a custom Spring Boot application built by using reusable frontend and backend components provided by the Open Source Sirius Components project. When running on the entreprise version of the Obeo Cloud Platform Modeler, additional, proprietary components are available to provide more features, but the principles are the same.
The Sirius Web repository provides an example of a complete, ready-to-run studio based on the Open Source components. It can be used as a starting point to create your own modeler.
4. Business Domain Definition
While the architecture of the Obeo Cloud Platform Modeler is not tied to the Eclipse Modeling Framework, EMF models are currently the first supported type of domain models.
If you have an existing EMF metamodel which represents your business domain, to use it in you modeler you need to:
-
Make sure the JARs for the metamodel itself and its
.editsupport are in your application’s classpath. Typically this involves publishing the two JARs in a Maven repository and adding their coordinates into your sample application’s POM file. Example in Sirius Web. -
Register your metamodel in your application. This is done by creating a Spring
@Configurationwhich provides your meta-model’sEPackageandAdapterFactoryas Spring@Beans. Example in Sirius Web. -
Provide an implementation of
org.eclipse.sirius.web.api.services.IImagePathServicewhich tells Obeo Cloud Platform Modeler in which folders (relative to the root of the JAR) the icons for your metamodel types can be found. Example in Sirius Web.
If you do not yet have an EMF-based domain model, you can use Ecore Tools to design and implement it, and then follow the same steps as above.
5. Sirius Desktop Compatibility
Modelers based on the Obeo Cloud Platform Modeler can reuse Sirius Desktop modeler definition files (.odesign files).
Only a subset of the Sirius Desktop features are currently supported, but you can safely use a complete odesign file in the Obeo Cloud Platform Modeler.
The features which are not supported at the moment will simply be ignored. Future versions of the Obeo Cloud Platform Modeler will increase the scope of Sirius Desktop features supported. If you rely on specific features from Sirius Desktop, do not hesitate to contact us.
The Obeo Cloud Platform Modeler currently only supports a subset of Sirius diagrams and properties views. Tables, trees, and sequence diagrams are not supported at the moment.
For diagrams, the Obeo Cloud Platform Modeler currently supports the main features of:
-
nodes and containers;
-
relation-based and element-based edges;
-
border nodes;
-
style customizations;
-
creation tools, direct-edit tools, generic tools.
For properties view, the following widgets are supported:
-
text fields and text areas;
-
checkboxes;
-
radio buttons;
-
select/combos;
-
lists (read-only).
To use an existing odesign modeler definition in the Obeo Cloud Platform Modeler:
-
Make sure the JAR which contains the modeler definition is in your application’s classpath. Typically this involves publishing the
.designJAR in a Maven repository and adding its coordinates into your sample application’s POM file. Example in Sirius Web. -
In your application, provide a Spring
@Configurationwhich implementsorg.eclipse.sirius.web.compat.services.api.ISiriusConfigurationand tells the platform the path (inside the JAR) where the.odesignfile is available. Example in Sirius Web
6. Project Webhooks
|
Before you Start
Who can use this feature Users with Owner access to the server can manage the webhooks Included in the Obeo Cloud Platform Modeler |
Learn the basics of how webhooks work to help you build and set up integrations.
Webhooks allow you to build or set up integrations which subscribe to certain events on the Obeo Cloud Platform Modeler. When one of those events is triggered, we’ll send a HTTP POST payload to the webhook’s configured URL. Webhooks can be used to update a database, update a backup mirror, integrate with another web appllication. You’re only limited by your imagination.
When a project event is triggered, the Obeo Cloud Platform Modeler provides a way to notify an external application. This mechanism is named webhook and works thanks to a REST API.
A webhook must observe the following prerequisites:
-
Expose an HTTP/HTTPS endpoint that implement a GET and POST method
-
The GET method must return a valid the Obeo Cloud Platform Modeler Webhook Manifest
-
The POST method should expect to receive a body with a Webhook Notification
The Obeo Cloud Platform Modeler provides several types of events to listen:
-
SEMANTIC: Triggered when a semantic object or a model is created, updated or deleted.
-
REPRESENTATION: Triggered when a representation is refreshed.
| A webhook can listen one or a mix of these event types |
6.1. Register a Webhook
When you register a new webhook, the only thing to define is its URL.
To register a new webhook:
-
Open the Project Settings page.
-
Click the Webhooks section.
-
Set the URL.
-
Click on Add.
6.2. Unregister a Webhook
To unregister a webhook: . Open the Project Settings page. . Click the Webhooks section. . Click on the Remove button.
6.3. Webhook Manifest
A valid webhook manifest:
{
  "manifestVersion": "1.0",
  "name": "Webhook Demo",
  "eventTypes": ["SEMANTIC", "REPRESENTATION"]
}
All fields must be valuated:
-
manifestVersion: The manifest version of the webhook API
| The actual and only version of the webhook API is "1.0" |
-
name: The webhook name to use in the project webhook admin page
-
eventTypes: The expected webhook event types to listen
6.4. Webhook Notification
The webhook POST endpoint will receive notification messages. You can retrieve the json notification message in the POST body.
A semantic notification example:
{
  "id": "f8b5d193-2ae1-413d-984b-ca3a2fd67cac",
  "projectId": "e8ee9867-61ab-41b3-b67c-ef564dab12b2",
  "event": "SEMANTIC",
  "manifestVersion": "1.0",
  "data": [
    {
      "id": "ab167202-fd62-4d4f-a8ae-c705a6dbcd73",
      "name": "model1",
      "content": "..."
    },
    {
      "id": "6c0f216a-d16d-4e36-82fa-c878e5be7c38",
      "name": "model2",
      "content": "..."
    }
  ],
  "created": 1586354861017
}
A representation notification example:
{
  "id": "46dbd3f1-c385-4e7f-9330-21f71c9fb002",
  "projectId": "e8ee9867-61ab-41b3-b67c-ef564dab12b2",
  "event": "REPRESENTATION",
  "manifestVersion": "1.0",
  "data": {
    "id": "2e8b58dd-b80e-4ff0-9f9e-94e1ddbda924",
    "targetObjectId": "b4f90e6d-a77c-4f32-abcf-172fbeb7993f",
    "descriptionId": "be7d39c3-9ce3-4dec-a56a-cd05dedfafc4",
    "label": "Topography",
    "position": {
      "x": 0,
      "y": 0
    },
    "size": {
      "width": 0,
      "height": 0
    },
    "nodes": [],
    "edges": []
  },
  "created": 1586355733788
}
Frequently Asked Question
How is Obeo Cloud Platform Modeler licensed ?
If you are using Obeo Cloud Platform Modeler online (hosted by us), this EULA applies.
Eclipse Sirius Web is licensed under the EPL 2.0 license, and you can find the source code at the Eclipse Foundation : http://eclipse.org/sirius.
What is Sirius Desktop vs Sirius Web vs Obeo Cloud Platform Modeler ?
The Eclipse Sirius is an open source project to create domain-specific modeling workbenches. It has two flavors :
-
Sirius Desktop : create modeling workbenches based on the Eclipse platform,
-
Sirius Web : create cloud-ready modeling workbenches.
The Obeo Cloud Platform Modeler is built as an open-core product relying on Sirius Web. It is a Sirius Web build extended with Enterprise features, to deploy on public, private clouds or on premise and including support and upgrade guarantees.
Authentication FAQ
My credentials do not work, I can’t log in!
If you are on Windows, please check that your antivirus software is not configured to block the Obeo Cloud Platform Modeler authentication page. Else check with the Obeo Cloud Platform Modeler administrator that your credentials are valid, send an email to ocp-modeler@obeosoft.com.
How do I get an account to the Obeo Cloud Platform Modeler?
Navigate to the sign up page, fill the form and send your reqest. If you did not receive any news for 2 days, ask for a Username and a Password to the administrator of the Obeo Cloud Platform Modeler server by sending an email to ocp-modeler@obeosoft.com.
How do I retrieve my Username / Password if I forgot them?
Ask to the administrator of the Obeo Cloud Platform Modeler server to send you back your credentials.
How do I change my Username?
Ask to the administrator of the Obeo Cloud Platform Modeler server to change the Username for you.
How do I reset my Password?
Ask to the administrator of the Obeo Cloud Platform Modeler server to generate a new password for you.
How do I delete my account?
Ask to the administrator of the Obeo Cloud Platform Modeler server to delete your account.
Export FAQ
Is it possible to upload an EMF model I created classicaly with Eclipse?
Yes definitely, if the metamodel corresponding to the model instance is deployed on the server. You can use the Upload a Model capability to import your data into the Obeo Cloud Platform Modeler.
How do I download a project?
See the Download a Project section to learn how to proceed.
How do I download a model?
See the Download a Model section to learn how to proceed.
How do I upload a project?
See the Download a Project section to learn how to proceed.
How do I upload a model?
See the Download a Model section to learn how to proceed.
Features
Features list
| Feature | Open source (Sirius Web) | Enterprise (Obeo Cloud Platform Modeler) |
|---|---|---|
Projects Management |
||
|
|
|
|
|
|
|
|
|
|
|
|
|
|
|
Collaboration |
||
(All the projects are Public) |
|
|
|
|
|
|
|
|
|
|
|
Advanced |
||
|
|
|
|
|
|
Release Notes
Version 2020.10.0
Initial release!
The Obeo Cloud Platform Modeler is a unique technology to easily develop custom and state-of-the-art modeling tools to be deployed in the Cloud.
OCP Modeler is built as an open-core product relying on Sirius Web. It extends the Open Source Sirius Web with Enterprise features, to deploy on public, private clouds or on premise and includes support and upgrade guarantees.
New
-
Principles you like in Sirius Desktop, available on a modern cloud-based stack:
-
Graphical and Domain-Specific: Create custom graphical modeling workbenches support both your specific visual notation and your own domain concepts.
-
Defined by a Configuration File: Visual editors are declared by a configuration file which is interpreted at runtime, meaning very few lines of code and easy tuning.
-
Deployed on a Web Server: The backend of your modeling tool is deployed on a web server running with state-of-the-art technologies: Spring, React, PostgreSQL, GraphQL.
-
Rendered in a Web Browser: Once deployed on a server, just start using the modeling tool directly from a web browser, without specific installation on user’s desktop.
-
-
Easily create and deploy studios to the web:
-
Projects Browser: lists all the projects accessible with your account.
-
Project Editor: the main page where you can explore a project, edit a model and get a graphical representation
-
The Project Explorer: navigates through the models of a project,
-
The Details View: presents the properties of the current selected element,
-
The Diagram Editor to manage model elements graphically.
-
-
Fixed
-
None yet, this is the first release.
Changed
-
None yet, this is the first release.
Enterprise
-
Users management: Control who can connect, only users authorized by the administrator can access to the hosted projects and their contained models.
To share a project with other users, its owner can make it public and/or define access rights. Once connected, any user is able to create a project and share it with other users.
-
Teams: Define role-based access control, permissions on a project (read, write, admin) are defined by creating teams. It allows the administrators of a project to manage users depending on roles shared by a set of other users (rather than defining the permissions at the individuals' level).
-
Live collaboration: Indicators of Active Users, view in real-time who is working on a diagram. Visual indicators show you in real-time the other users who are currently working on the same diagram as you. Indicators also show you who is on the objects that you are editing and which properties are currently changing.
Developer
-
Webhooks: Webhooks allow you to build or set up integrations which subscribe to certain events on the Obeo Cloud Platform Modeler. When one of those events is triggered, we’ll send a HTTP POST payload to the webhook’s configured URL. Webhooks can be used to update a database, update a backup mirror, integrate with another web application. You’re only limited by your imagination.
Known issues
Here is where you can find a list of issues currently being investigated by our engineering team. This list will be updated regularly, and issues will be added and removed as they are discovered and resolved.
Projects Management
Missing navigation links between some pages
-
Issue description: Some parts of the UI are currently missing navigation links to go back once they are opened. For example, when opening the Project Settings page, there is no explicit link to go back to the project.
-
Workaround: Either use the browser history to go back to the previous page, or go back to the Projects List page (click on the top-left icon) and then navigate to the target page from there.
-
Issue status: Planned.
In some circumstances, models do not appear immediatly inside the model explorer
-
Issue description: Under some circumstances (notably after a period of inactivity on an open browser tab), existing models are not visible inside the model explorer when opening a project, or right after they are created.
-
Workaround: Refresh the browser page (F5) to make the models visible.
-
Issue status: Fix in progress.
The Onboarding area can not be re-opened once a diagram has been opened
-
Issue description: When first opening a project, the center of the page displays an Onboarding UI with easy access to the most common actions to get started. However once you have opened a diagram it is not possible to get back to this UI.
-
Workaround: Go back to the Projects List and re-open the project to see the onboarding area again.
-
Issue status: Planned.
When downloading a full project, the files inside the archive do not have an extension
-
Issue description: When you download the full content of a project, you get a zip archive. The archive contains all the models and representations contained in the project, each in a separate file, but the files do not have an extension. In practice all the files are in JSON.
-
Workaround: if you need to inspect the files' content, rename them with the
.jsonextension before. -
Issue status: Planned.
Long operations do not provide an indication that they are in progress
-
Issue description: When triggering a long-running operation (e.g. creating or opening a very large diagram or invoking a costly tool), there is no feedback for the user that the operation is in progress. If the operation is running server-side, the client UI can still be reactive, which allows the user to trigger other operations on projet states which will soon be invalid, which can cause unexpected effects.
-
Workaround: None at the moment (keep calm and wait).
-
Issue status: Implementation in progress for some operations; planned for later for others.
Diagram Editor
The current zoom displayed in the combo is not synchronized
-
Issue description: In the top-right corner of a diagram, a combo-box is available to select a specific zoom level. However if you change the zoom level using the mouse wheel, the value displayed in the combo is not updated and thus does not reflect the current level anymore.
-
Workaround: None at the moment.
-
Issue status: Implementation in progress.
A left click on the diagram always opens the palette, even when clicking to drag/scroll
-
Issue description: When you left-click on the diagram, the contextual palette always opens, even if you simply wanted to select an element or scroll/pan inside the diagram, and not invoke a tool.
-
Workaround: You can use the right mouse button to scroll around the diagram, which does not open the palette, and use the left button only to select elements/open the palette.
-
Issue status: Under investigation (the palette should only open on a simple click, not on a click and drag action).
Under Firefox, the contextual palette on diagram does not open at the correct location
-
Issue description: Under Firefox, when you click inside a diagram to select an element, the contextual palette sometimes opens too far from the mouse location (especially when selecting elements inside containers). Note that despite its incorrect location, the palette and its elements still work correctly and apply to the selected element.
-
Workaround: Use a Chrome based browser.
-
Issue status: Planned.
Diagram tabs can not be closed
-
Issue description: When opening a diagram, it creates (or reuses) a tab at the top of the diagram area, but these tabs can not be closed.
-
Workaround: None at the moment, but note that this does not have any impact on memory/performance. Diagrams which are not currently visible in inactive tabs do not take up any resources.
-
Issue status: Implementation of a simple "close" button is in progress, with more complete tab management features in design phase and planned for later.
Direct Edition of edges' labels does not work
-
Issue description: If you select an edge on a diagram and hit F2 (or start typing), a direct edit field opens, but if you try to change the label it has not effect.
-
Workaround: Edit the corresponding model attribute using the properties view of the edge.
-
Issue status: Implementation in progress.
Deletion of edges from the palette does not work
-
Issue description: If you select and edge on a diagram and try to invoke the Delete tool from the palette, nothing happens.
-
Workaround: Edit the corresponding reference in the model using the properties view.
-
Issue status: Implementation in progress.
The palette and modal dialogs sometimes disappear without user intervention
-
Issue description: If you are working on a shared project and open the contextual palette or a dialog, sometimes the palette or dialog disappears without you doing anything. This is due to another user having made a change on the project while the palette/dialog was opened on your side. The remote change triggers an automatic update of your view of the project, which invalidates the palette or dialog currently opened.
-
Workaround: None at the moment.
-
Issue status: We are currently examining which behavior would be the best in such a case before implementing it.
Downloading and re-uploading a model may lose some information
-
Issue description: When downloading a model as a local file (Download context menu item from the explorer) and then re-uploading the same file (Upload Model from the project’s context menu), depending on the underlying metamodel it is possible that some references are lost in the process.
-
Workaround: None at the moment.
-
Issue status: Planned.
Project Explorer
The "New Object" menu entry sometimes open a dialog which does not offer any choice
-
Issue description: In the model explorer, all the model elements offer the "New Object" context menu entry to create sub-elements. However not all object types support sub-elements. For those, the menu entry is currently available anyway, but does not propose any concrete choice. It should simply not be proposed in the context menu in this case.
-
Workaround: None at the moment.
-
Issue status: Fix in progress.
Details view
Multi-valued references can not be edited
-
Issue description: If you select an element which has a many-valued reference to other elements, the properties view displays de list of referenced element, but no edition operations are available.
-
Workaround: None at the moment.
-
Issue status: A more complete list widget, with create/add/remove/reorder operations is planned for future versions.
Non-modifiable properties appear as editable in the properties panel
-
Issue description: Even if you have write access to a project, some elements can have properties which are not editable (for example if they are derived from others). Currently there is no feedback for this: the properties appear editable but trying to change them has no effect.
-
Workaround: None at the moment.
-
Issue status: Implementation in progress (widget of non editable properties will appear disabled).
Newly created elements are not automatically selected
-
Issue description: When creating new elements (either from the explorer or directly from a diagram), the diagram will automatically be updated and display them (if relevant to the current diagram), but they will not be selected.
-
Workaround: None at the moment (except manual selection after the refresh).
-
Issue status: Planned.
When trying to create an edge there is no feedback when the target element is incompatible
-
Issue description: If you select an element on a diagram and then click in the palette on an edge creation tool, you can then point to the target element for the new edge. There is currently no visual feedback if you point towards a target element which is not compatible with the source and/or the type of edge, which can cause confusion as nothing happens when you select the target element.
-
Workaround: None at the moment.
-
Issue status: Under investigation (the mouse cursor should change to indicate the target is invalid).
In the properties view, editing a text field is only taken into account with the 'Return' key
-
Issue description: If you select an element in the explorer or on a diagram, its properties are displayed in the properties view on the right. If you change the value of a text property, the change will only be taken into account reliably when you hit 'Return'. Just selecting another part of the UI may lose the change.
-
Workaround: Always validate your text properties change with 'Return'.
-
Issue status: Fix in progress.